The lazy person's guide to the Backyard Leaves scarf
I do not pretend to have some great knitterly knowledge. I would say I am an average knitter with an average understanding of various finishing techniques...where I excel is having a relaxed approach to knitting. If the stitch count is out by 1 - who cares?! If it's out by 10...well, mmmm, who cares??!!! Certainly this drives certain knitting friends insane. But it works for me.
That said my FOs tend to be sometimes a bit disappointing. But this is why I normally knit to give away - I never really plan something to be perfectly fitted to me, or suited to me - I just knit something that looks interesting and give it to whomsoever it fits/suits when it's finished.
Since knitting is just a hobby I do for fun, I think it's essential I maintain this carefree come-what-may attitude. I worry and fret too much about getting things perfect at work for 70% of my waking hours, why would I want to worry and fret during my fun hours too?
So here I present "The lazy person's guide to the Backyard Leaves scarf". I feel this tutorial is necessary to show all the worriers and fretters out there that joining the two halves of the Backyard Leaves from Scarf Style is really not a hassle. It is not rocket science. It does not require a provisional cast on. It does not require grafting, or Kitchener Stitch. It does not require a wand, nor a spell. It can be done in a few simple, lazy, carefree steps and turn out to look Just Fine In The End.
So, here it is, my first ever lazy person's on-line tutorial. I hope someone gets some useful information out of it.
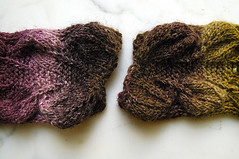
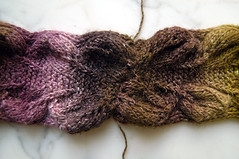
Step 1. Two halves of the scarf completed:
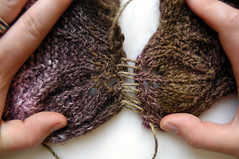
Step 2. Begin by sewing the two halves together using mattress stitch.

Step 3. Here we see the mattress stitch aligning the two halves of the scarf and matching up at the centre 'stalk' of each leaf on either side. But wait! There's a big gaping yo there! What to do!?!?
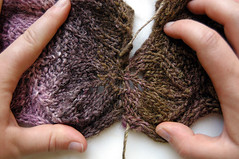
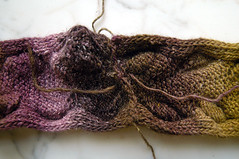
Step 4. Never mind that big hole! Just keep sewing!
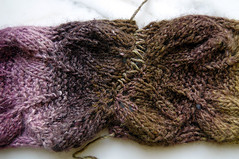
Step 5. Here we see the entire length of the two ends sewn up in mattress stitch.
Step 6. Pull the mattress stitch tight and voila! I challenge you to find any difference between this and a Backyard Leaves over which someone has performed all sorts of tricks and feats of finishing!
Step 7. And just for good measure, weave in your ends. Here is a shot of the back of the work, with the ends unwoven. I will spare you the further gory weaving in details (because I haven't done that part yet).
 And there you have it! Two ends of a Backyard Leaves scarf perfectly joined and ready to wear!
posted by Meg @ 5:48 pm
![]()


<< Home